Let me take you on a journey through my love for the beautiful Peperomia angulata, also known as the Radiator Plant. As a plant enthusiast living in the UK, I’ve discovered the joy of caring for this low-maintenance houseplant and how it effortlessly adds a touch of greenery to my home.
Picture this – it was a gloomy day in London, and I longed for some natural beauty to brighten up my living space. So, I decided to bring the outdoors in and welcomed the Radiator Plant into my humble abode. Little did I know that this simple decision would transform my home into a tranquil oasis.
Upon entering my living room, you’ll immediately notice the exquisite variegated foliage of the Peperomia angulata. The vibrant and dark green leaves create a stunning contrast, adding a unique texture to the overall decor. It’s truly a sight to behold and a conversation starter for any houseguests.
But it’s not just about the aesthetics, my Radiator Plant has proven to be a resilient companion, thriving even in our unpredictable British weather. Its adaptability to different light conditions allows me to place it anywhere in my home, whether it’s a bright spot near a sunny window or a cozy corner with lower light levels.
As I care for my Peperomia angulata, I’ve learned a few valuable tips along the way. From understanding its specific light requirements to providing the right amount of water without overdoing it, nurturing this plant has become a rewarding experience for me. And now, I want to share my wisdom with you, my fellow plant lovers in the UK.
Appearance of Peperomia Angulata (Radiator Plant)
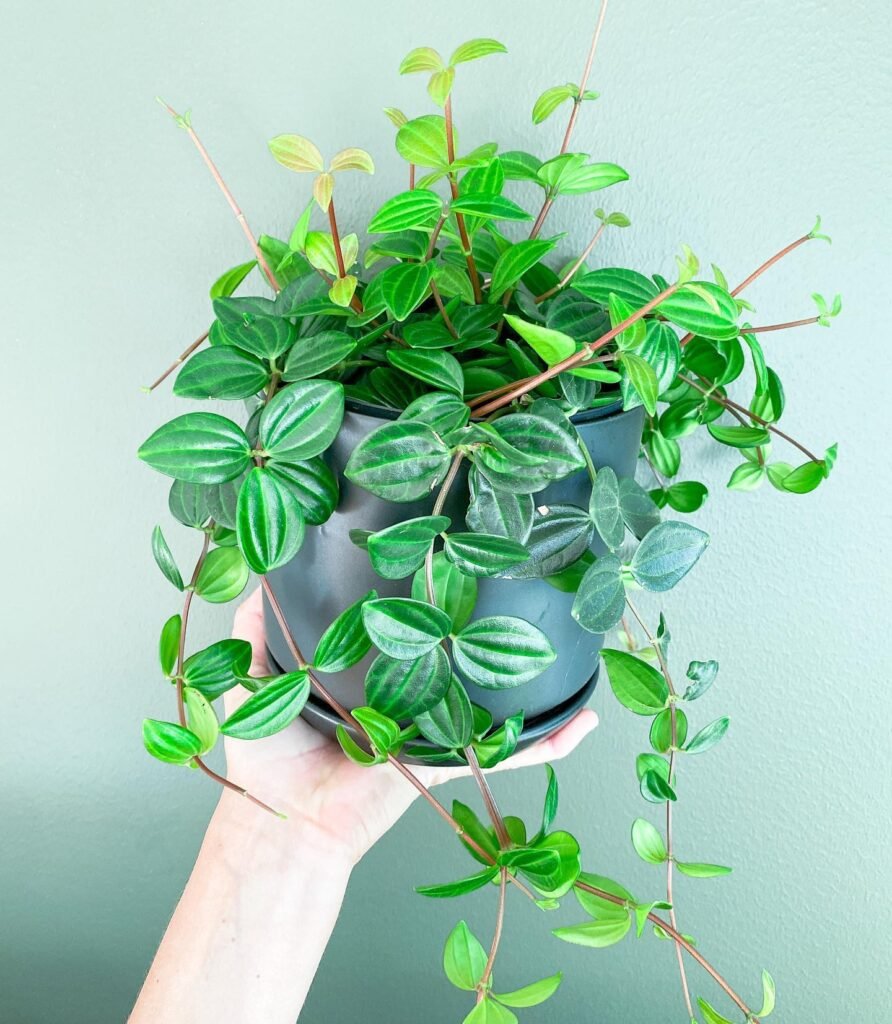

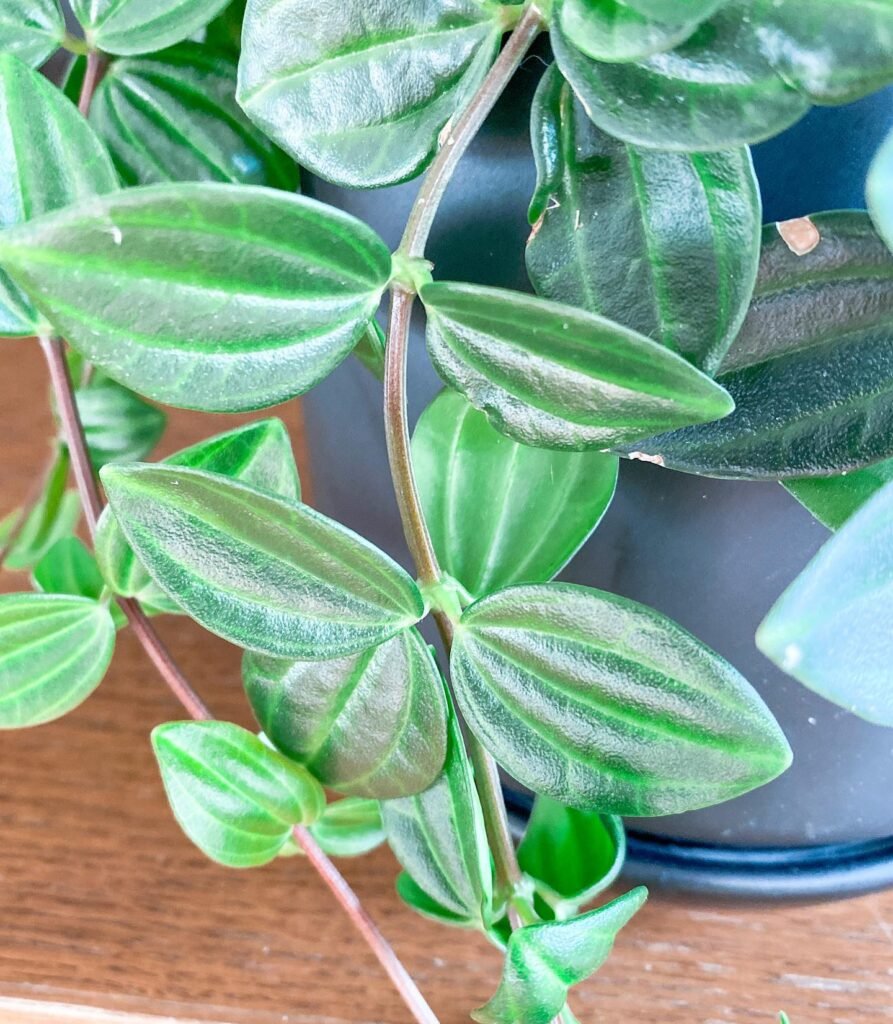
Peperomia angulata, also known as the Radiator Plant, is a stunning houseplant that captivates with its unique appearance. The plant’s variegated foliage showcases a beautiful mix of vibrant and dark green shades, adding a touch of natural elegance to any space.
The leaves of Peperomia angulata are thick and succulent, giving them a visually interesting texture that adds depth and dimension to its overall appearance. The variegation patterns on the leaves can vary, with some exhibiting marbled patterns or splashes of white, cream, or yellow. This striking contrast of colours creates a visually appealing display that is sure to catch the eye.
Understanding the appearance of Peperomia angulata is essential when it comes to providing the right care for your plant. The variegated foliage requires proper lighting, watering, and maintenance to ensure its long-term health and vibrancy.
Key Features:
- Vibrant and dark green variegated foliage
- Thick and succulent leaves
- Varied variegation patterns, including marbling or splashes of white, cream, or yellow
By understanding the appearance of Peperomia angulata, you can appreciate its unique beauty and provide the necessary care for this remarkable houseplant.
 Did you know Peperomia Angulata can prosper under fluorescent lights, making it perfect for offices or low-light rooms? This resilience stems from its South American forest origins, where it adapted to grow in the shade. It’s a great pick for adding greenery to dimly lit spaces!
Light Requirements for Peperomia Angulata


When it comes to providing the ideal light conditions for your Peperomia angulata, it’s important to strike a balance. This beautiful houseplant thrives in bright, indirect light, making it a perfect addition to any room in your UK home.
To meet its light requirements, find a spot near a window where the plant can receive moderate light without being exposed to direct sunlight. The variegated foliage of the Peperomia angulata will really pop in this type of lighting, showcasing its vibrant and dark green shades.
However, don’t worry if your living space doesn’t offer abundant natural light. Peperomia angulata is a flexible plant that can tolerate lower light conditions as well. It will still grow and flourish, making it an ideal choice for areas such as bathrooms or rooms with limited access to sunlight.
Remember, finding the right balance of light is key to ensuring the health and vitality of your Radiator Plant (Peperomia angulata).

Watering Tips for Peperomia Angulata (Radiator Plant)


In order to keep your Peperomia angulata healthy and thriving, it’s important to follow proper watering practices. This low-maintenance plant prefers to be kept on the drier side, so it’s best to allow the top inch of soil to dry out between waterings.
Overwatering can be detrimental to the health of your Radiator Plant, as it can lead to root rot. Therefore, it’s crucial to avoid excessive moisture in the soil. Remember, it’s better to underwater than to overwater when it comes to Peperomia angulata.
A light misting of the foliage can benefit this plant, particularly during dry indoor months. This helps to increase humidity around the plant, mimicking its natural habitat.
By following these watering tips, you can ensure that your Peperomia angulata remains happy and healthy, adding a touch of greenery to your UK home.

Fertilizing and Soil for Peperomia Angulata


Peperomia angulata, also known as the Radiator Plant, is a low-maintenance houseplant that doesn’t require frequent fertilizing. However, providing it with the right nutrients is essential for its overall health and growth. Here are some tips on fertilizing and choosing the right soil for your Peperomia angulata:
Fertilizing
I recommend using a balanced, water-soluble houseplant fertilizer for your Peperomia angulata. Dilute the fertilizer to half-strength and apply it once a month during the growing season, which typically runs from spring to summer. By using a diluted solution, you prevent the risk of over-fertilizing your plant, which can lead to nutrient burn.
Soil
The soil you choose for your Peperomia angulata should be well-draining, allowing excess water to pass through easily. This helps prevent waterlogged roots, which can lead to root rot and other issues. I recommend using a high-quality, well-draining potting mix specifically formulated for indoor plants. This type of soil also allows for proper air circulation around the roots, promoting optimal plant health.
By following these fertilizing and soil tips, you can ensure that your Peperomia angulata remains healthy and thrives in its indoor environment. Remember to always check the moisture level of the soil before watering and adjust your fertilizing routine based on the specific needs of your plant.

Pruning and Maintenance for Radiator Plant

When it comes to maintaining your Peperomia angulata, pruning is generally not necessary. However, trimming any leggy stems can help encourage bushier growth, keeping your plant looking fuller and more compact.
Another important aspect of maintenance is regularly removing any yellow or damaged leaves. This helps not only in maintaining the plant’s aesthetic appeal but also in promoting overall plant health. By removing these leaves, you prevent potential diseases from spreading and allow the plant to focus its energy on producing new, healthy foliage.
“Regular pruning and removing yellow leaves help keep my Radiator Plant healthy and vibrant. It also allows me to maintain its beautiful shape and prevent any potential pest infestations.”
It’s also essential to keep an eye out for pests, such as spider mites, which can sometimes infest Peperomia angulata. If detected, addressing these pests promptly can prevent them from causing significant damage to your plant. There are various methods of pest control, including natural remedies and commercial products, that can effectively address these unwanted visitors.

Propagating Peperomia Angulata (Radiator Plant)


Propagating Peperomia angulata, commonly known as the Radiator Plant, is a simple and rewarding way to expand your collection of these beautiful houseplants. With just a few steps, you can create new plants from stem cuttings and share the joy of gardening with your friends and family.
Taking Stem Cuttings
To propagate Peperomia angulata, start by selecting a healthy stem with a few leaves. Using clean, sharp scissors or pruning shears, make a clean cut just below a leaf node. The leaf node is the point where a leaf attaches to the stem. Ideally, choose a stem that is around 4-6 inches long for optimal success.
Rooting in Soil
One way to root the stem cuttings is by placing them directly into moist soil. Fill a small pot with a well-draining potting mix, creating a hole using your finger or a small stick. Insert the bottom end of the stem cutting into the hole, ensuring that at least one leaf node is below the soil surface. Gently press the soil around the cutting to provide support. Place the pot in a warm and bright location, but away from direct sunlight. Keep the soil consistently moist, but not soggy, until roots develop, which usually takes a few weeks.
Rooting in Water
Another method for propagating Peperomia angulata is through water propagation. Simply place the stem cutting in a clean glass container filled with water. Make sure that the bottom leaf node is submerged in the water while the leaves remain above the surface. Place the glass container in a bright location, but out of direct sunlight. Change the water every few days to prevent stagnation and maintain cleanliness. Over time, you will start to see roots emerging from the submerged node. Once the roots are well-developed, you can transplant the cutting into soil.
Note: It’s important to avoid overwatering during propagation. Peperomia angulata prefers slightly drier conditions, so be cautious not to let the cuttings sit in waterlogged soil or stagnant water.
Transplanting the New Plant
Once the roots have developed and are strong enough to support the plant, you can carefully transfer the new Peperomia angulata to a small pot filled with fresh potting mix. Gently remove the cutting from the water or soil, taking care not to damage the delicate roots. Place the plant in the center of the pot and add more soil around it, ensuring the roots are fully covered. Lightly tamp down the soil to provide stability. Water the newly potted plant and place it in a warm, well-lit spot that receives indirect sunlight.
Remember, propagating Peperomia angulata can be a fun and rewarding experience. By following these simple steps, you can expand your plant collection, share the beauty of this houseplant with others, and take pride in nurturing new life.

Repotting Tips for Radiator Plant
Repotting my Peperomia angulata is a task I undertake every 2-3 years, or sooner if I notice the plant has become root-bound. This means the roots have filled up the pot, leaving little room for growth or soil. To ensure my plant continues to thrive, I select a new pot that is slightly larger than the current one. It’s crucial that this pot has adequate drainage to prevent water from sitting at the bottom, which could lead to root rot.
I then fill the pot with fresh, well-draining soil. This type of soil is essential for Peperomia angulata, as it ensures excess water can easily escape, preventing the roots from becoming waterlogged. When it comes to the repotting process itself, I’m always gentle with the roots to avoid causing any unnecessary stress or damage to the plant.
One key point I always remember is to position the plant at the same depth it was in its previous pot. This means the soil level should not be significantly higher or lower on the stem than before. Getting this right helps the plant adjust more quickly to its new home and continue growing healthily.
For new gardeners, it might seem a bit daunting at first, but repotting is a straightforward task once you understand the needs of your Peperomia angulata. Remember, a little care and attention during the repotting process can make a big difference in the overall health and growth of your plant.
Did you know Peperomia Angulata, or the Radiator Plant, not only beautifies your home but also purifies the air? It absorbs pollutants, making it an ideal plant for improving indoor air quality. Plus, it’s very easy to look after, perfect for both expert gardeners and beginners wanting to green their space efficiently.
The Pet-Friendly Nature of Peperomia Angulata
Good news for pet owners! Peperomia angulata is considered a pet-friendly plant, making it a safe choice for households with cats and dogs. So, you can enjoy the beauty of this stunning plant without worrying about the safety of your furry friends. However, it’s always a good practice to discourage pets from chewing on any houseplants to prevent any potential digestive issues.
Helpful Videos about Peperomia Angulata
Have a look at these marvellous videos I’ve come across, all focused on nurturing Peperomia angulata. They’re brimming with tips to make caring for this delightful plant utterly simple. Ideal for anyone eager to step into the realm of gardening! Each video has been handpicked to offer you the best guidance, ensuring your Peperomia angulata thrives. For those ready to green their thumbs, these finds are a fantastic starting point.
- Peperomia Angulata Care And Growing Guide
- PEPEROMIA ANGULATA: how I take care of mine!
- Peperomia Angulata Rocca Verde Care and Propagation
FAQ about Peperomia Angulata (Radiator Plant)

Wondering about the optimal ways to look after your Peperomia angulata? You’ve stumbled upon the right spot! I’ve gathered all the essential tips to guide you through caring for this lovely plant with ease. From understanding its light preferences to mastering the watering routine, you’re all set to help your Peperomia flourish.
Peperomia Angulata is a charming, low-maintenance houseplant known for its attractive foliage and easy care, making it perfect for beginners.
Water when the top inch of soil feels dry, typically once a week, but less often in winter. Overwatering can lead to root rot.
It prefers bright, indirect sunlight. Too much direct sun can scorch its leaves, while too little light can cause leggy growth.
Yes, it thrives indoors in the UK climate. Just keep it away from cold drafts and extreme temperature changes.
Use a well-draining, peat-based potting mix. Adding perlite or vermiculite can improve drainage.
Repot in spring every 2-3 years or when it becomes root-bound. Choose a pot only slightly larger than the current one.
Yes, it’s easily propagated from leaf or stem cuttings. Plant them in moist potting soil, and they should root in a few weeks.
Yellow leaves can result from overwatering, poor drainage, or nutrient deficiency. Ensure proper watering and consider a balanced fertiliser.
Feed with a diluted, balanced fertiliser every 4-6 weeks during the growing season (spring and summer).
Keep an eye out for common pests like spider mites. Wipe leaves with a neem oil solution or insecticidal soap to treat infestations.
It can tolerate low light but thrives best in bright, indirect sunlight. Growth may slow in lower light conditions.
Prune to maintain shape or remove leggy stems. Use clean scissors to cut just above a leaf node.
Keep it in temperatures between 18°C to 24°C. Avoid exposure to temperatures below 10°C.
Place the pot on a tray filled with pebbles and water or use a room humidifier to increase ambient moisture.
Drooping can be due to underwatering, overwatering, or low humidity. Check the soil moisture and adjust your watering schedule accordingly.
Yes, it is non-toxic to cats and dogs, making it a pet-friendly houseplant choice.
This could be powdery mildew, a fungal issue. Increase air circulation and reduce humidity. Treat with a fungicide if necessary.
Regular pruning of leggy stems can encourage a bushier plant. Also, ensure it’s getting enough light to promote dense growth.
I trust this FAQ has shed some light on the care for your Peperomia angulata. Should you have any further inquiries, please feel free to drop them in the comments. I’m here to assist. Bear in mind, we all begin our gardening journey without prior knowledge, and there’s continually something new to discover as you nurture your leafy friend.